Last night’s topic for Home School Ham Radio was antennas, so I figured what better way to demonstrate a directional (Yagi) antenna than to have a mini fox hunt in Fremont Park. Sounds fun, right? Except that, when I decided to do the fox hunt, I had neither a directional antenna nor a fox transmitter. So, 2 weeks prior, I decided to remedy that problem.
First off, I should probably step back and explain what a “fox hunt” is, for any one who might have no clue. Basically it’s a game that amateur radio people sometimes like to play; a high tech version of hide and seek. Someone builds (or buys) a small, portable transmitter and then hides it somewhere. Its sole job is to send out a beacon periodically on a given frequency. Then the hider gives the frequency and any other clues or details to the seekers. The seekers are armed with a radio and a directional antenna. Because the antenna is directional, the beacon should get stronger when pointed in the direction of the fox and weaker when pointed away. Using this setup, the seekers can travel in the direction of the signal, triangulating along the way, and hopefully find the fox wherever it might be hidden.
If you start miles away from the fox, the signal is generally weak, so the signal should disappear when the antenna is pointed away from the fox. However, once you start to get close, the signal gets so strong that it will seem like the signal is coming from all directions. In fact, if you’re close enough, you can even detach the antenna from your radio and it will still pick up the signal. This becomes a problem when locating the fox in that last mile or so. In my case, I knew that I would be hiding the fox somewhere within the park, so we would be starting out really close.
Step 1: Attenuator
So, the first thing that I built was an “attenuator”. The dictionary definition of “attenuate” is:
to weaken or reduce in force, intensity, effect, quantity, or value:
And that’s exactly what an attenuator does; it’s designed to decrease the amount of signal received by the radio. Normally, in amateur radio, you don’t want to do that; you want the strongest signal you can get. But, in the case of a fox hunt, it is designed to decrease the signal back down to a point where the difference between pointing the antenna at the fox and away from the fox can be heard again.
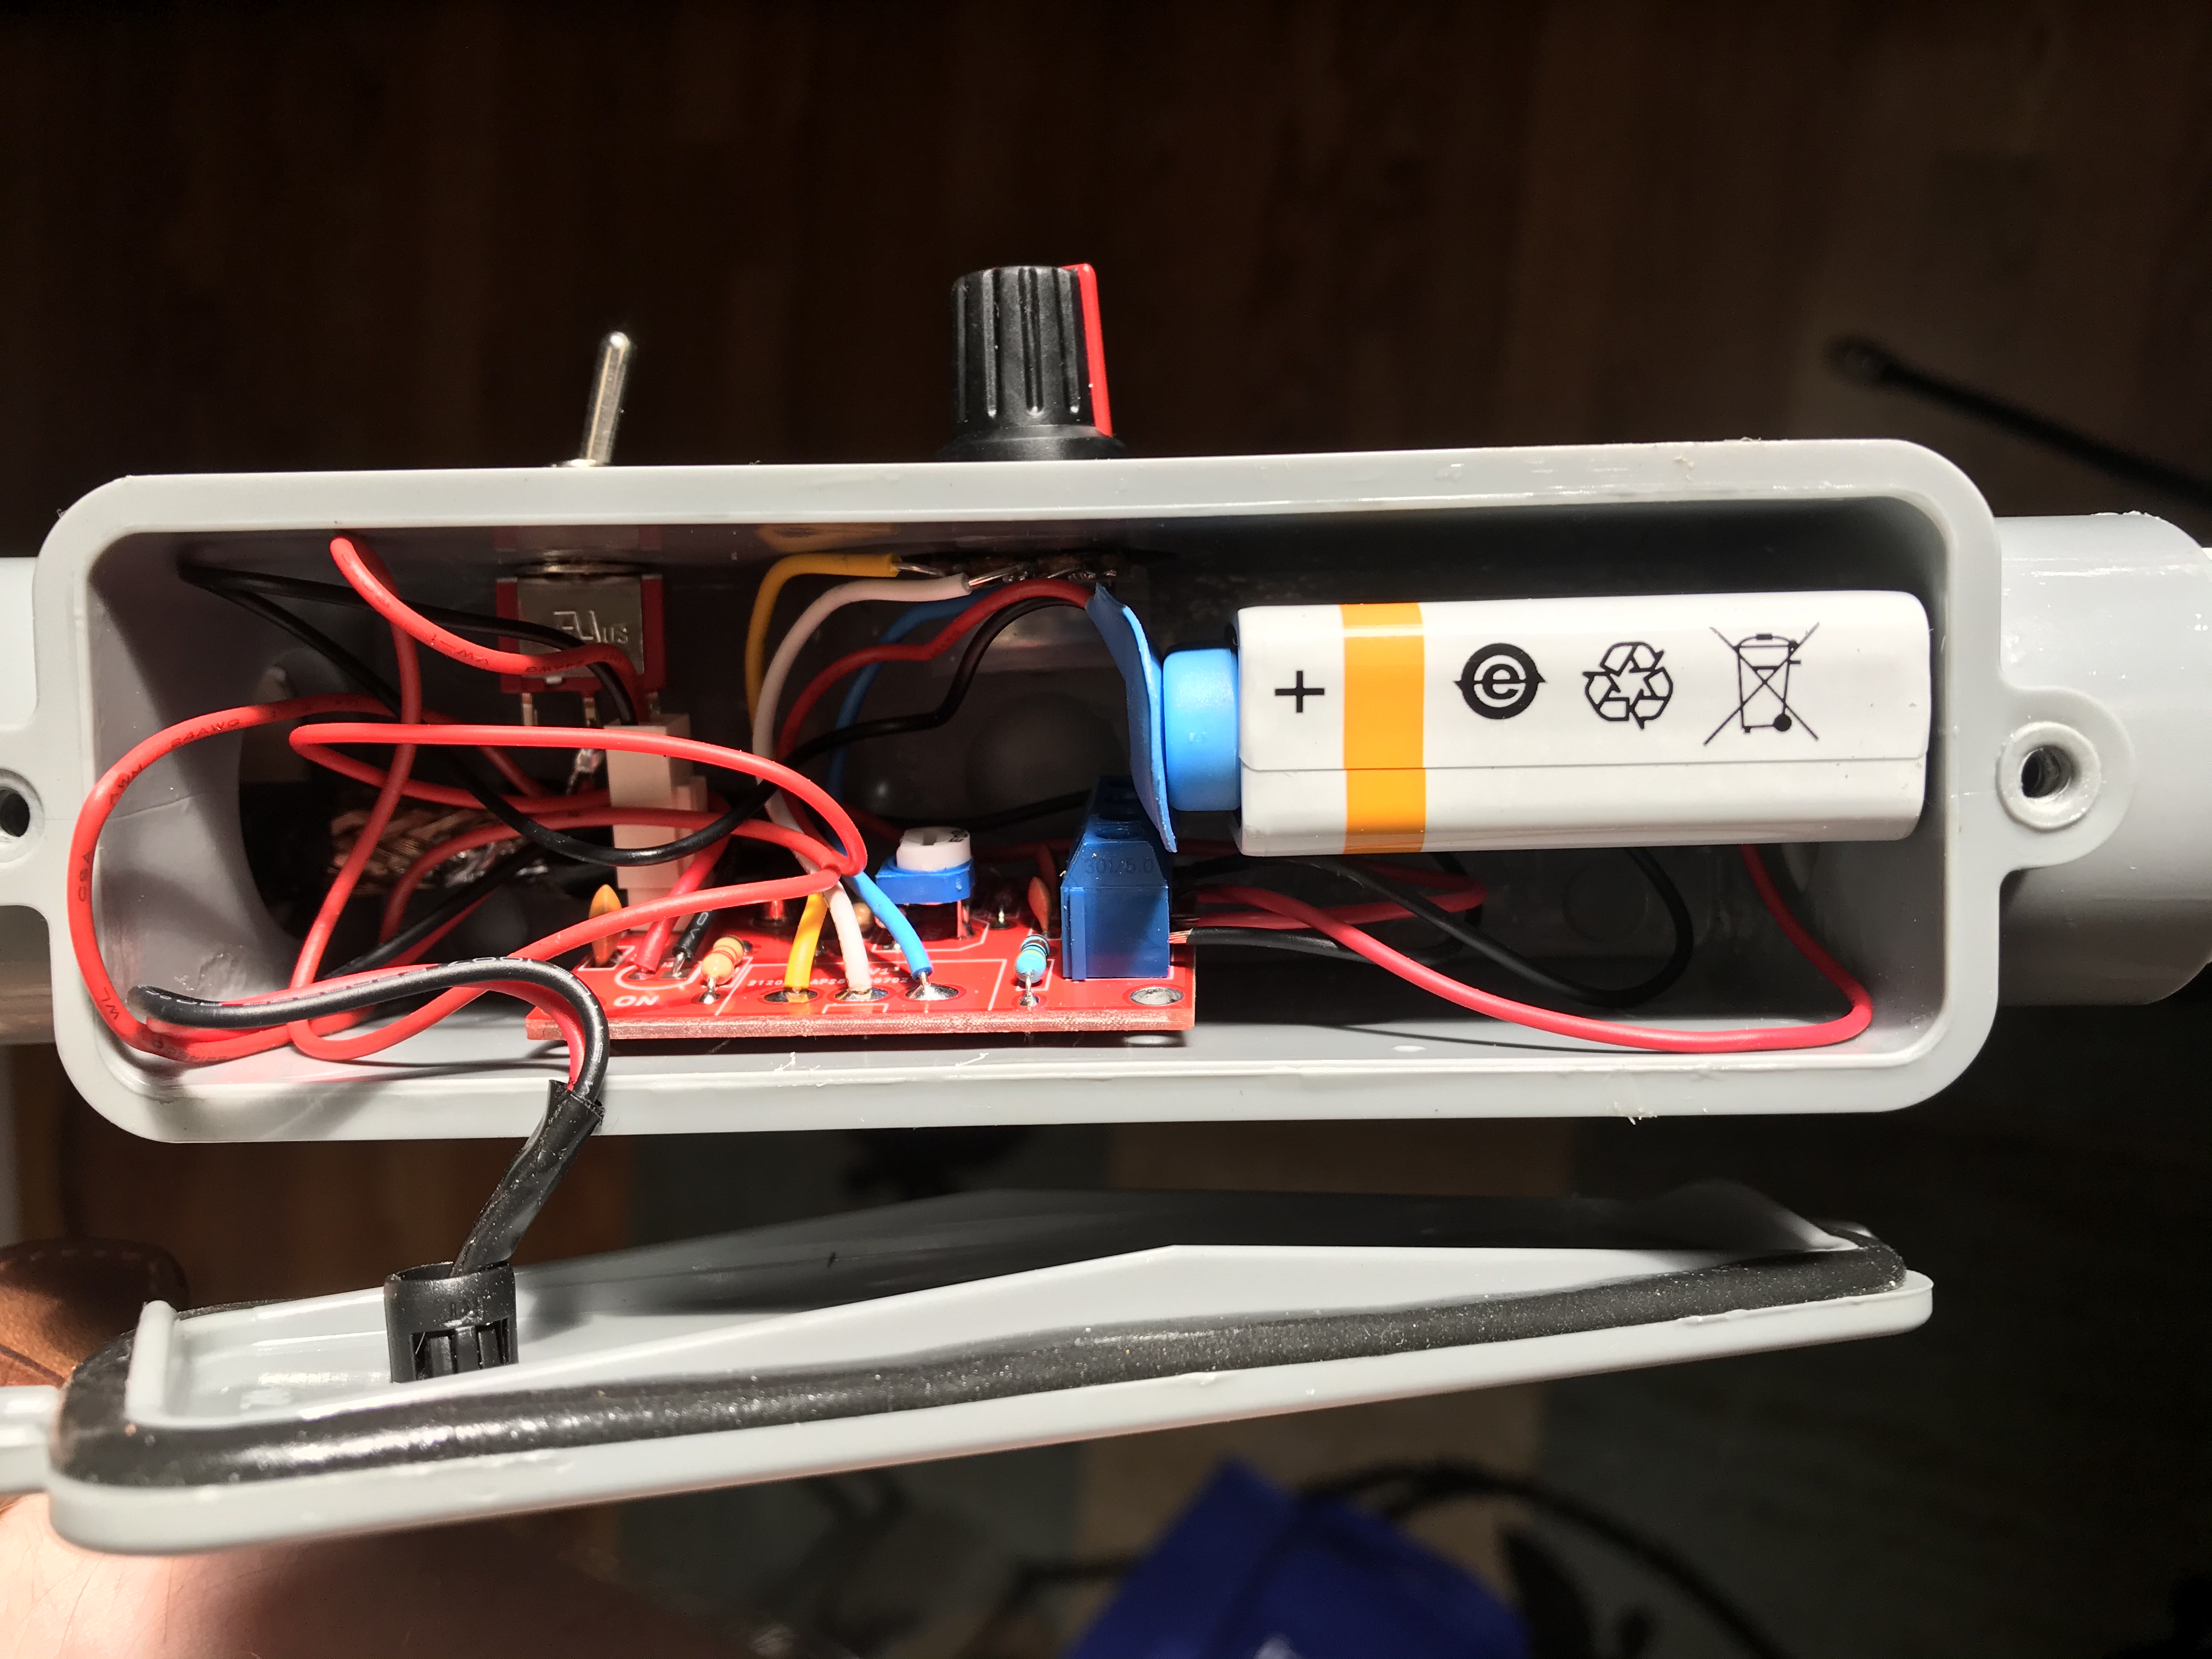
I decided to go with a kit attenuator from 3rd Planet Solar / KC9ON.

This kind of attenuator will mix the incoming signal with a small signal generator in order to generate a signal 4 MHz above or below the fox’s signal. Then you can turn the knob to increase or decrease this new signal. So, for example, in our Fremont class, I chose a frequency of 147.54 MHz for the fox to transmit on and then added 4 MHz to it, for a final frequency of 151.54 MHz. This is the frequency that I tuned the radio to. The neat thing about this arrangement is that, because the radio is 4 MHz off of the target signal, if the attenuator is turned off, the radio won’t receive any signal.
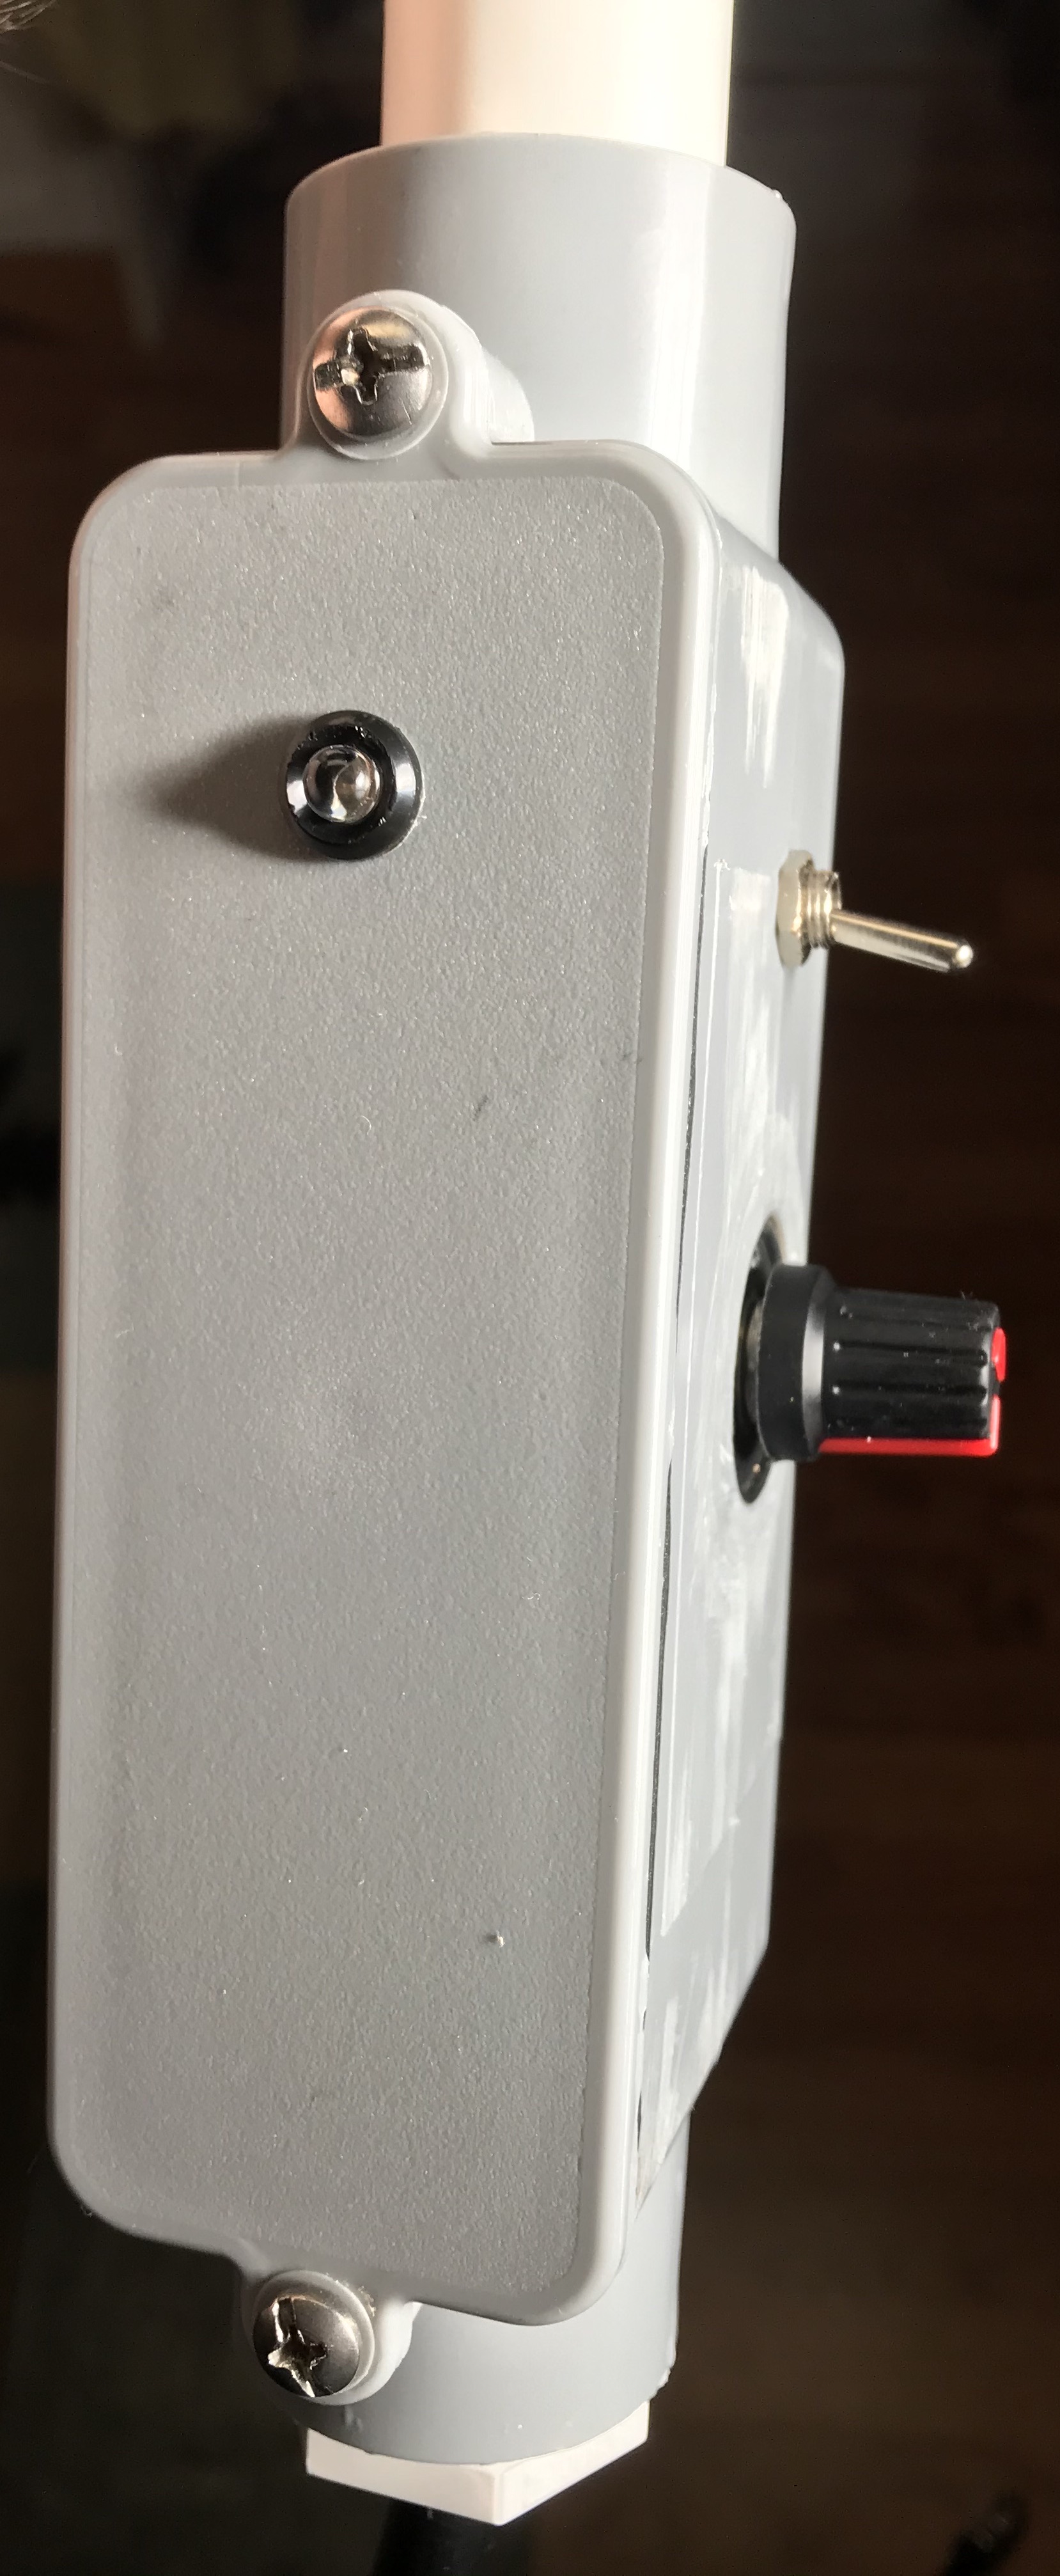
You can buy the attenuator already assembled and soldered, but I chose the kit that just had all the parts and you have to solder it yourself. I wanted to put it in a specific enclosure and needed to extend the distance between certain parts like the light, the switch, and the knob.
Here’s what it looks like all assembled:
Step 2: “Tape measure” Yagi Antenna
Once that was done, the next step was to build a “tape measure” Yagi antenna.
Emma helped me build the antenna and we recorded the build; We used the plans created by NT1K.

Here’s what it looks like all assembled:
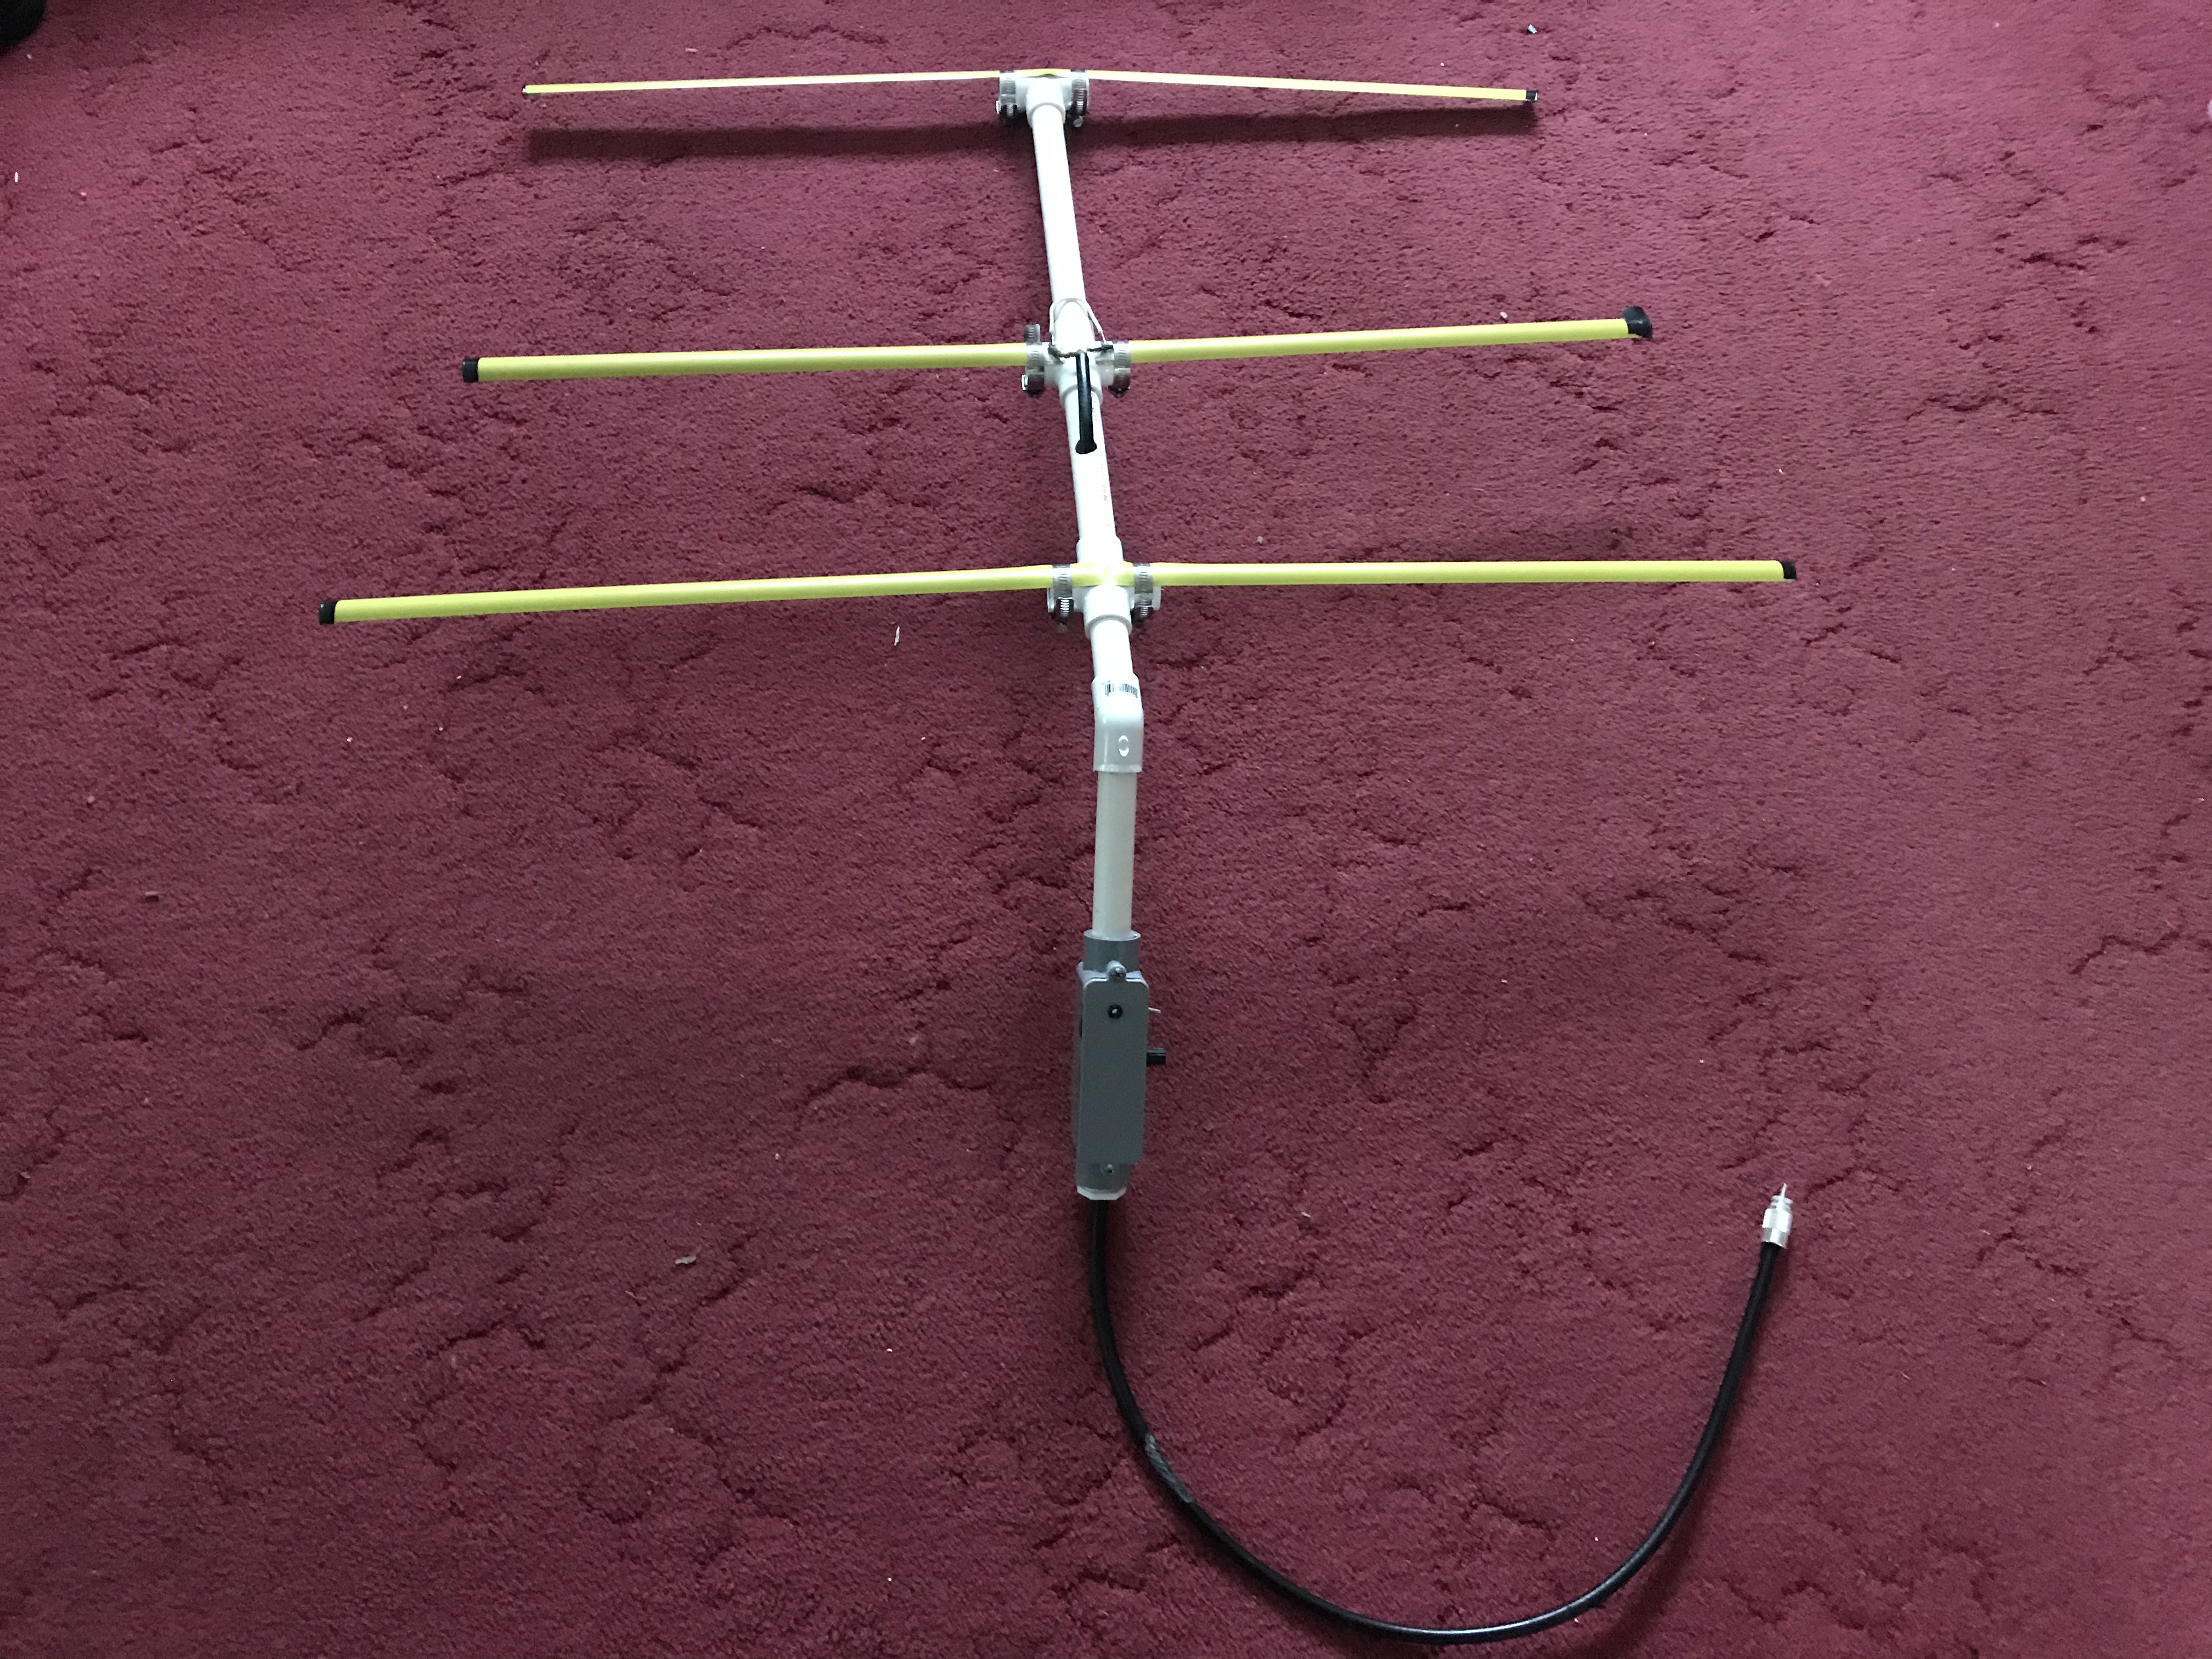
Overall, the parts are pretty cheap to buy at a hardware store. The only special parts that are ham-radio-specific are the PL-259 connector at the end and the RG-58 coaxial cable. You will need to be able to solder wires, but you can get pretty cheap soldering irons. Harbor Freight has the cheapest irons I’ve found. No bells and whistles, but they will get the job done.
Step 3: Fox Transmitter
I knew a fellow ham that already had a fox transmitter, so I had hopes that we could simply borrow that for our meeting. Unfortunately, schedules did not align and it didn’t work out, so I had to get creative.
I initially thought I needed to buy a special transmitter, like the Byonics MicroFox, but they are all over $100 and even if I wanted to spend the money, there wasn’t enough time to get one shipped out in time for the class.
But then it dawned on me that it’s just a radio and I already have a couple of those.
I found this video on YouTube about simply hooking an MP3 player to a Baofeng radio with an audio cable.
I even had the right cable! So, I dug out a really old iPod we don’t use anymore, created an audio file with my callsign and message, and imported it into the iPod. The theory was that I could switch the Baofeng into “VOX” (voice activated) mode and then when the audio file played, it would transmit the audio. On the iPod, I could switch it into “repeat single” mode and it would just play the same audio file on repeat forever. I used Audacity to add 15 seconds of silence to the end of the audio file. The theory was that the VOX mode on the radio would detect silence and stop transmitting.
Except that theory didn’t work. The audio triggered the radio to transmit, but when it got to the silence part, it wouldn’t shut off. We can’t have that happening, so back to the drawing board.
I had the radio part figured out, I could just use a Baofeng. But the two things left to figure out was generating some sort of signal and triggering the Push-to-Talk (PTT) to get it to transmit. That second part is tricky.
The Baofeng has a connector that looks like this:
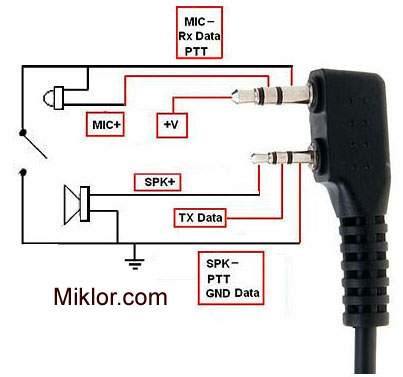
In order to trigger the PTT, you have to connect the sleeves of both pins. A lot of devices that can be programmed to do things, like computers or phones, don’t have any way of making this electrical connection; typically they just have USB ports as their way of connecting to other devices.
But… Arduinos and Raspberry Pis do! They have “general purpose I/O” (GPIO) pins that can basically turn a voltage on or off. I have devices of both families laying around, so I started searching the Net for designs. I decided to look for Arduino designs first because they are much simpler devices and don’t need a full-on operating system, like a Raspberry Pi does.
As luck would have it, I stumbled upon this design from NF7Z Nelson Farrier:
Auto-Keyer for Radio “Fox Hunting”
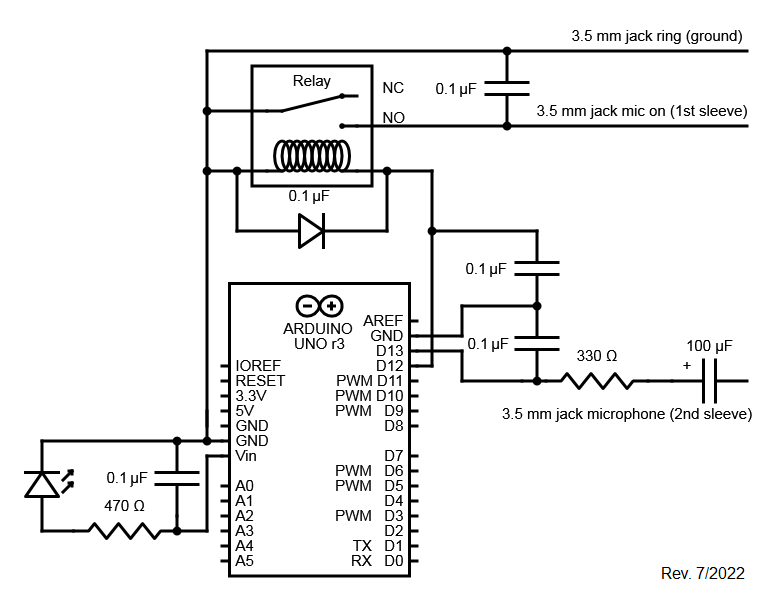
Fortunately, between my parts box and Emma’s parts box, I managed to find all of the necessary electronics parts, like capacitors, resistors, and the relay. The tricky part was finding the right cable to connect to the Baofeng. Like I mentioned before, I do have a BTECH APRS-K1 TRRS / APRS Cable, but I discovered that it only connects the mic and speakers, there is no way to trigger the PTT. The expectation, when using this cable is that you will just enable VOX on the Baofeng. After my earlier attempt, I wanted to avoid VOX.
I could have soldered up a new cable for this, but, since this was really intended to be a temporary solution, I didn’t want to use up some connectors. But I happened to have a cable that has a Baofeng-compatible end on it from Mobilinkd. I knew that the Mobilinkd TNC was able to trigger the PTT using this cable, so I just had to get the connections right.
I modified the Arduino code to put my callsign in. The code makes the Arduino generate a morse code audio sequence that beeps out “W8WJB FOX” and then follows with a short tone to help with getting a heading when swinging the Yagi around.
Just turn on the Baofeng radio, tune it to the desired frequency, and plug in the Arduino. It repeats the sequence over and over with a short pause in between until you power it off.
This was the result:
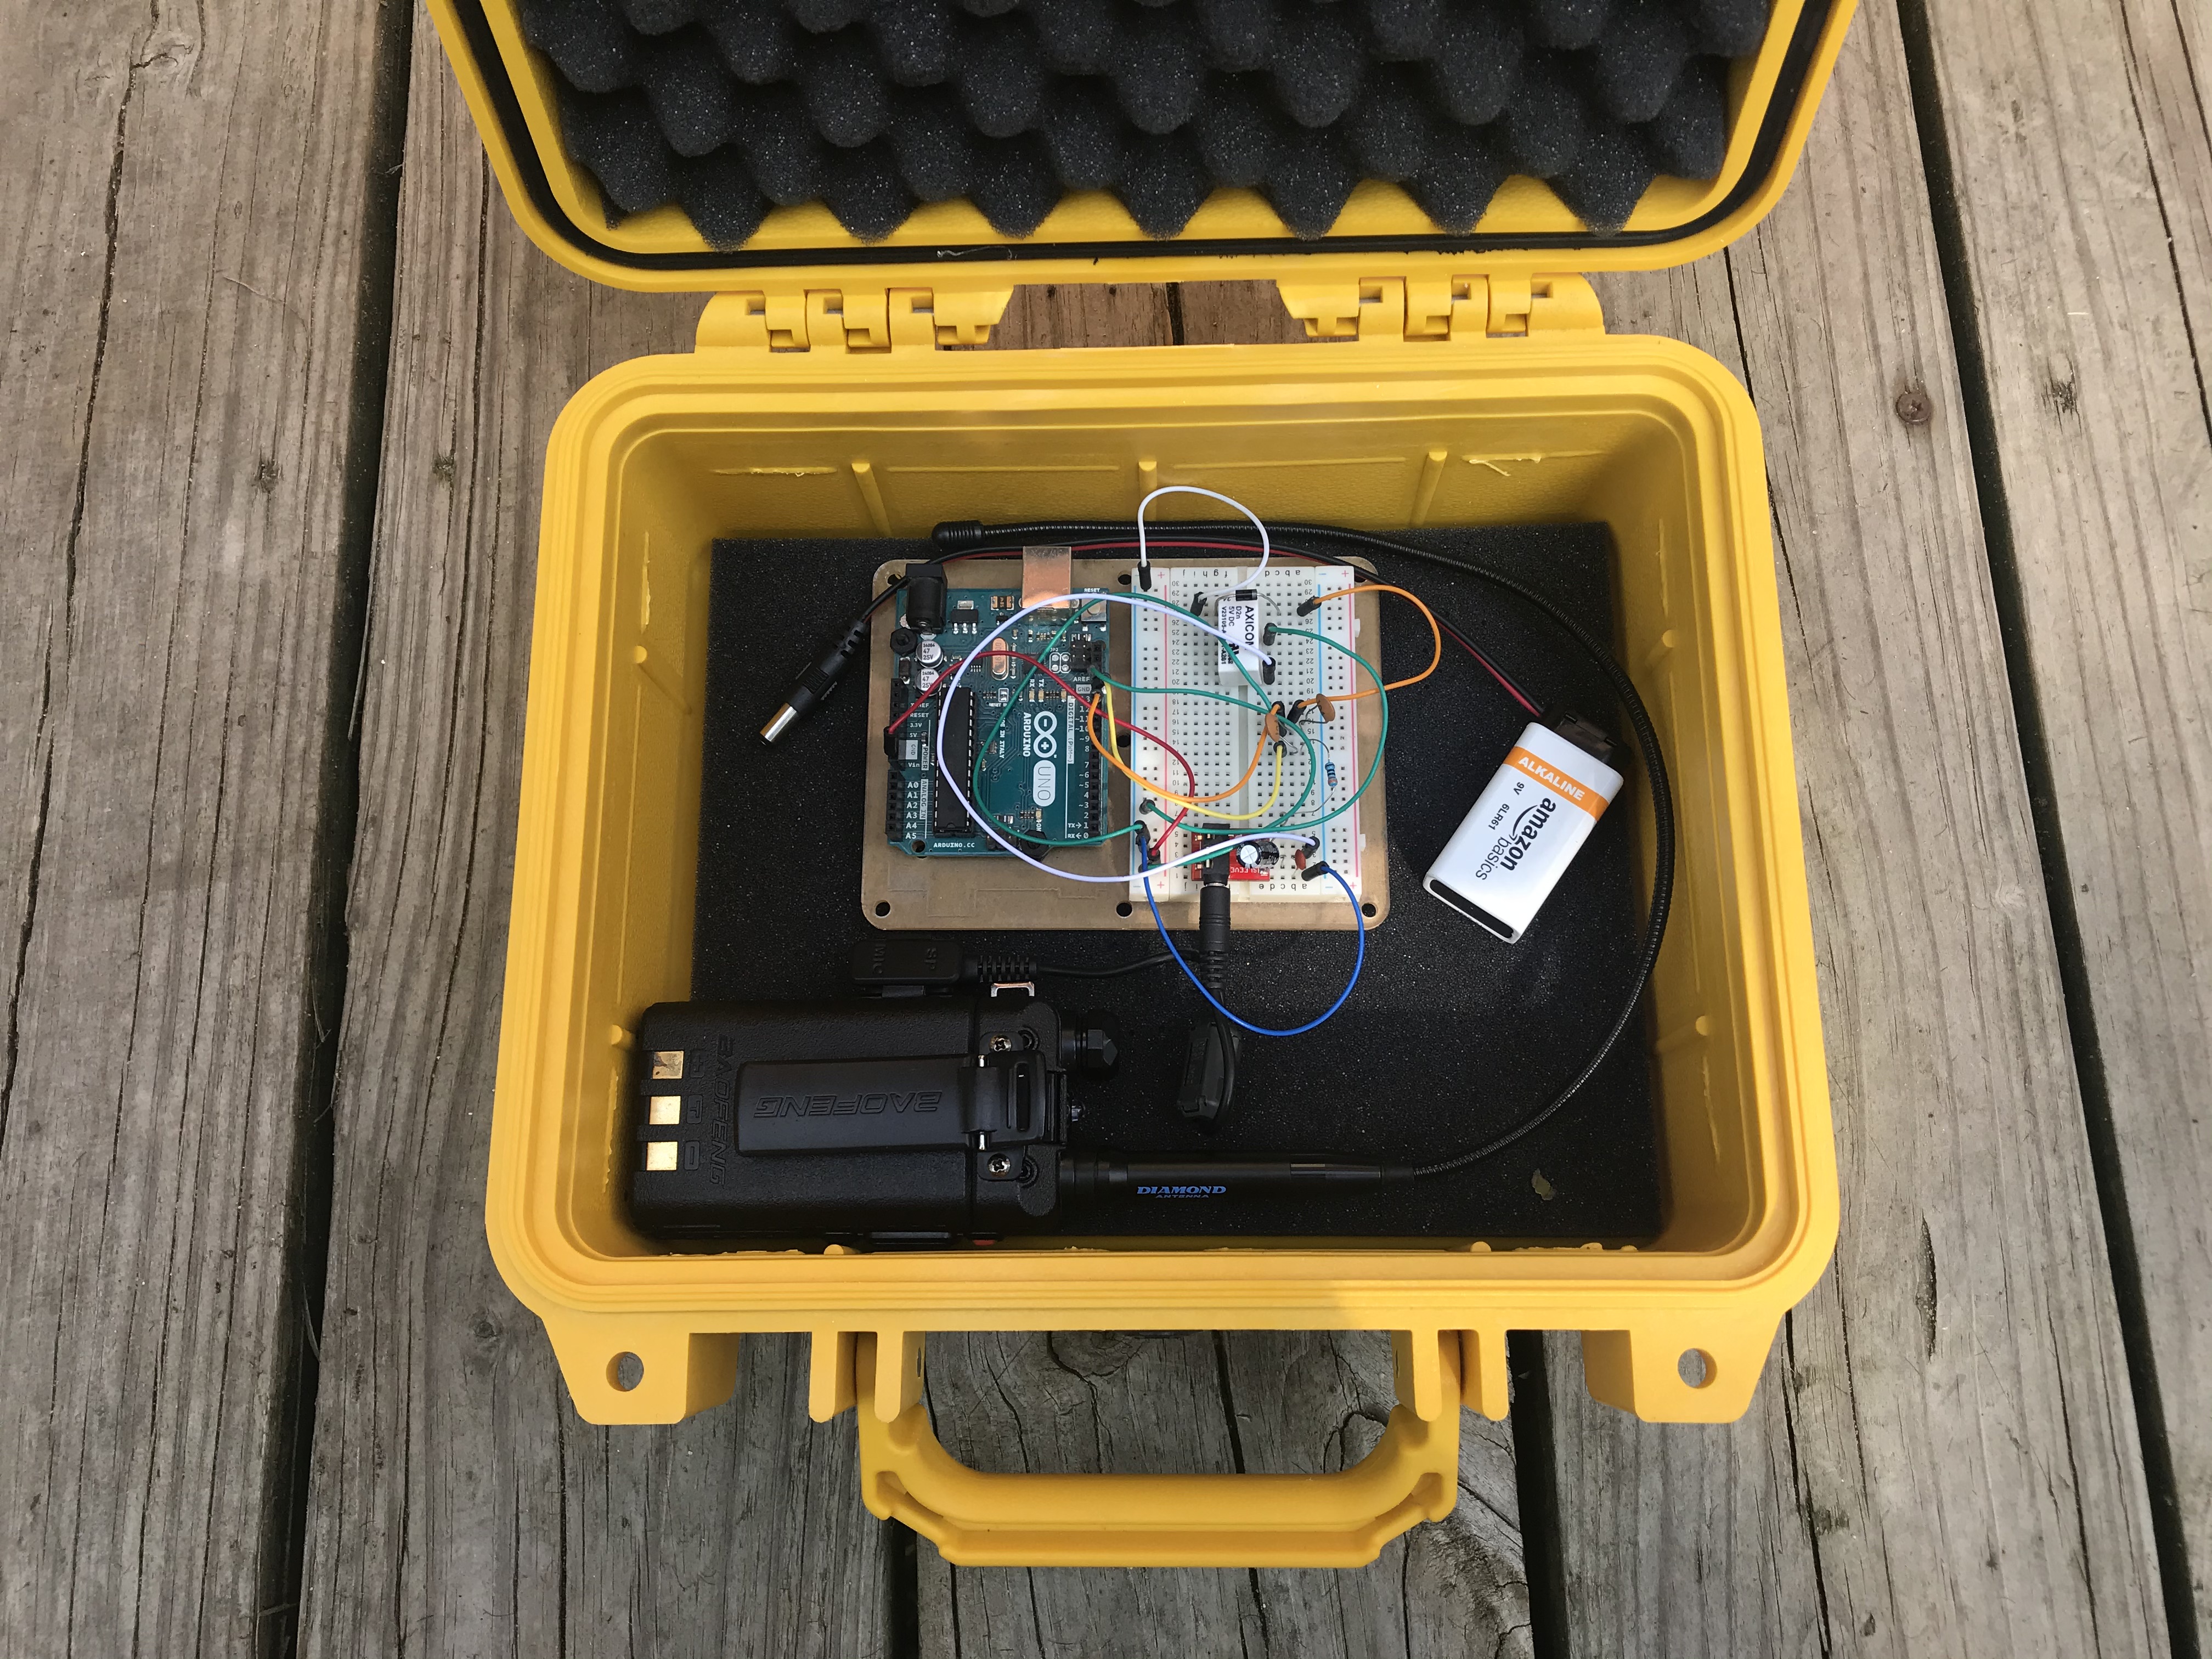
I secretly turned it on and hid it a half hour before the ham radio class. I’m happy to report that the kids managed to find it where it lay hidden in some brush!
I tried to hide it again, but we discovered that, in the excitement of the first find, it got jostled around pretty good. I think a wire probably came loose and it was no longer transmitting. There wasn’t time during the class for me to troubleshoot which wire, so we simply moved on with the lesson.
But, all in all, I would say that that, despite the last minute, rushed build, it worked for what we needed it to